

I have a few chooks, that obviously eat grain. I usually go into the pen and do the storybook thing and sprinkle grain about the pen. My theory was that they had to hunt throughout the pen for their food - a more natural way for them to get their food. Over the last few months I have noticed that I have a flock of pigeons that spend a lot of time in the pen with the chickens hunting around the pen for the grain that I so gaily scatter everywhere.

And then I looked at the price and decided that even the tiny ones would have to stay on the shelf.
So I turned to my friend Google and discovered that other intrepid souls had been where I wanted to go and that it was possible to make chicken feeder at home with "found ingredients" - that's my kind of project!
Here's what I did...


I did use plastic in the end because it was free and this seems to be a much more robust plastic than whatever they make make the chook feeders out of. I wont feel too bad about having to throw this out when it all finally falls apart as all the parts have had a second or third life already.
This bucket also has a handle. The grand master plan is to hang the feeder up making it even harder for the pigeons to get at the grain. I think they will just sit on the ground and put their wee beaks into the saucer and munch away if I don't I suspect. It will probably take the chookies a while to get used to the new feeding regime but I will still have scraps to throw around the pen for them to hunt and scratch for - they just happen to be things that pigeons don't seem to want to eat!
We have been considering a modification whereby we put a "cone shaped" something on the inside of the bucket so that the grain falls towards the edge as they peck through the holes.
I'm also hoping this will cut down on my grain bill and keep the other birds (and maybe rodents) away from the grain leaving more for the chookies to grow big and lay lots of eggs with!!
Score card:
Green-ness: 4/5 for keeping wild birds away from an artificial food supply
Frugal-ness: 5/5 for not spending a cent and still getting what we needed!
Time cost: about 1/2 hour to collect up the bits and clean, drill and glue. 6 hours setting time and another 10 minutes setting it up in the pen and getting organised
Skill level: Power tool skill level - might be able to do it without if your bucket isn't tooooo robust
Fun -ness: I think the chookies had more fun than I did!
So I thought I'd flummox them pigeons. I put the grain in piles around the pen in places that I just knew they wouldn't go. As it turns out - I know diddly squat about what a pigeon will and will not do. They were quite happy to feast at the pile rather than hunt for the grain as it it turns out.
What to do? I thought about one of those fancy bird feeder things and decided that I wasn't going to get a plastic one. They are cheap but with my experience with plastics in the Queensland sun, I thought it would bake and then fall apart. So I decided that a galvanised metal one was they way to go.

And then I looked at the price and decided that even the tiny ones would have to stay on the shelf.
So I turned to my friend Google and discovered that other intrepid souls had been where I wanted to go and that it was possible to make chicken feeder at home with "found ingredients" - that's my kind of project!
Here's what I did...

First you need a bucket with a lid - this is one I got from work but you can buy sturdy buckets with lids from Bunnings and the like. Don't forget to wash it out if you are repurposing your bucket (before you drill the holes - just a tip for the well prepared!)

Then you will need a base. I found a plant saucer that was bigger than the base of the bucket.

The husband decided that it would all go together a lot better if we got rid of the ridges on the saucer - so he used a hammer and chisel to get them off and make it smooth.

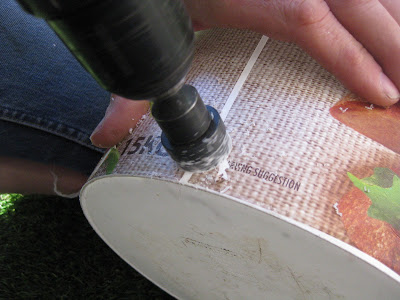
The he used a "mouse hole" drill to cut the holes for the grain at the base of the bucket.

Like so!

Here are the four holes evenly spaced around the bottom of the bucket.

Then with a tube of that "No More Nails" type stuff,

We stuck the two parts together.

An then put a weight on it and waited till the afternoon to make sure it had well and truly set.

Then I filled it 1/2 way with grain - and voila - grain comes out of the hole and into the saucer.

It didnt take the chookies long to work out how to get it to work!!!
I did use plastic in the end because it was free and this seems to be a much more robust plastic than whatever they make make the chook feeders out of. I wont feel too bad about having to throw this out when it all finally falls apart as all the parts have had a second or third life already.
This bucket also has a handle. The grand master plan is to hang the feeder up making it even harder for the pigeons to get at the grain. I think they will just sit on the ground and put their wee beaks into the saucer and munch away if I don't I suspect. It will probably take the chookies a while to get used to the new feeding regime but I will still have scraps to throw around the pen for them to hunt and scratch for - they just happen to be things that pigeons don't seem to want to eat!
We have been considering a modification whereby we put a "cone shaped" something on the inside of the bucket so that the grain falls towards the edge as they peck through the holes.
I'm also hoping this will cut down on my grain bill and keep the other birds (and maybe rodents) away from the grain leaving more for the chookies to grow big and lay lots of eggs with!!
Score card:
Green-ness: 4/5 for keeping wild birds away from an artificial food supply
Frugal-ness: 5/5 for not spending a cent and still getting what we needed!
Time cost: about 1/2 hour to collect up the bits and clean, drill and glue. 6 hours setting time and another 10 minutes setting it up in the pen and getting organised
Skill level: Power tool skill level - might be able to do it without if your bucket isn't tooooo robust
Fun -ness: I think the chookies had more fun than I did!
Comments