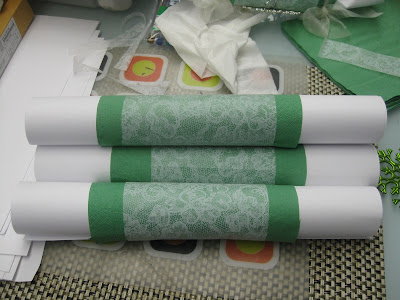
Each year I end up making my own Christmas crackers because I can never find the right colours to go with my table or because I want to customise or theme the gifts inside! Its quite easy and almost as cheap. I always end up spending more than I would have on 10 deluxe crackers from the shops but then I usually put in a gift/toy worth 2-3 dollars and a nice chocolate (or lolly if its an outside Christmas lunch!) in each one! I recommend giving it a go for your table this year - or maybe as a novel way to enclose a gift for teachers or friends at the office!
Here's what I did!
For these ones, I collected 12 cardboard tubes and then used plain white copy paper (but you can use any paper that suits your Christmas table) for the base. I then used 6 paper serviettes (that I cut in half and already matched my Christmas colours) and a piece of plastic "lace" table cloth that I got from Crazy Clarkes for $2 (and am using for a number of "craft" projects!)
I also managed to buy the cracker pulls (the bit that goes bang) for $2 at an OverFlow and of course the ribbon was another $2 bargain from a $2 shop!
And then with the gifts added - its not cheaper, just more personalised!
Place the cardboard roll in the center of the paper length ways. Tape one side of the paper to the cardboard roll and then wrap the paper around.
Secure the paper to the roll neatly in the middle - not the ends.
Cut your serviette to size, to cover just the roll - in my case in half and tape like you did to the white paper before wrapping the tube. The idea here was to have layers of colour - so I needed to be able to see the white as its my table predominate colour this year - and have the green as a contrast. Play with your papers to get the effect that you like.
Once again secure with tape. Keep all the taped sides on one side thus making a "top side" for display and a "bottom side" to place on the table.
Cut your decorative piece of paper to a slightly smaller size again and repeat the process to build up the layers of colour and texture.
Do this with each tube until you have the amount you need!
Cut ribbon to about 15-20cm lengths (tie one on the end of your test cracker to see how much you will actually need to tie off the end with before cutting the whole lot too long or too short!)
Like this!!!
Put the cracker pull into the cracker at this point and tape one end so that it doesn't fall out before you are finished making it.
Continue to do this with each cracker so that you have one end OPEN - other wise you wont be able to put the gifts, hats and jokes in!!!
I found this box of decorations at Aldi and fell in love with the snowflakes and decided to use them on my crackers - you could decorate them further with nearly any type of Christmas decoration that matches the theme you are using.
I used hot glue to attach my snowflake to the cracker as it was quite big and I thought it would slip off while it was drying if I used PVA glue. It seemed to work well!
And here they are - ready to be filled with a gift or trinket, a hat (have a look at a party place or make your own with tissue or crepe paper) and a bad Christmas joke printed out on the computer courtesy of my neighbour!
These are the hats, jokes, chocolates and toys bundles up ready to put into the cracker.
And this is this years trinket - mini snowflake pocket watches. Only a dollar each or two on e-bay!
This is selection of crackers I have made over the years... Purple and silver seem to be a bit of a theme!
I like making my own as it always matches exactly what I want to do and also so that I can put some decent trinkets in that will last longer than till the end of the meal! I often buy Christmas jewellery (on sale from Boxing day onwards for next years crackers) for the "girls" and brainteaser or puzzle type trinkets for the "boys". When you are buying these gifts, take along a tube so that you know it will fit inside. Its not much fun to spend $20 and then discover they don't fit...
Another tip would be about chocolates as gifts in your crackers - don't put them in unless you are SURE your cracker will be cool until they are pulled. The chocolate will melt and ruin all your hard work. Either put in an un-meltable edible or leave finishing the crackers until you are setting the table and pop it in then (that's what I usually do...) Even wrapped melted chocolate has a bad habit of hitting a hard object inside your cracker when you move it from storage to table and turning the inside of your cracker to a molten mess - Hot Australian Christmas Sun and chocolate dont mix well, I've found!
Score card:
Green-ness: If you are recycling or using papers you already have - it gets 5/5 the more you buy the "browner" this project gets!Frugal-ness: 3/5 Just because it would be quite a lot cheaper to buy crackers rather than make them. Decent gifts cost $
Time cost: If you have all the bits there already - about 3 minutes a cracker - also depends on how elaborate you are making them!
Skill level: Pretty easy really - just cutting and taping!
Fun-ness: Heaps of fun - especially hand choosing the papers and gifts!


Comments