

Many Many moons ago, a Landlord left a laundry shelf of home made ginger beer for us to drink when we moved into the house. It only took a few nights of glass bottle ginger beer explosions to work out why he decided to leave them for us rather than attempt to transport them to his new house! We enjoyed drinking them much more than we enjoyed cleaning up the glass bottle fragments I can tell you! Fast forward quite a few more years and a neighbour gives us a Ginger Beer Bug so we could make our own home made ginger beer - and we did! And it was great fun! And we used plastic 1.25 litre bottles and never cleaned up a single shard of glass - although we did have to mop down a few walls and even the ceiling on odd occasions - Don't shake your ginger beer before opening it, unless you like gingery sugary walls!
Making ginger beer at home is not hard at all and a nice change from cordials (or soft drink if that's your thing!) and can be the basis for a few mock-tails and even a cocktail or two to boot!
Here's what I did...
Ginger beer has two steps to making it. The first is to make a "bug" that forms the basis of the drink and the second part involves straining the bug to use to make the actual drink.

To make the bug, I used Sally Wise's recipe in her book - A Year in a Bottle (lots of other goodies in there too) And you simply mix a teaspoon of powdered ginger, a teaspoon of sugar and 1/2 teaspoon of dried yeast to a cup of warm water in a jar. Give it a bit of a stir and then pop a piece of muslin or a hanky (I ended up using a tissue) over the top, secured with a rubber band. Leave it on the kitchen bench somewhere where you will see it everyday.

Then give it a feed every day - it will need a teaspoon of sugar and a teaspoon of powdered ginger and a quick stir for 7 days. You should see the yeast doing its thing and bubbling and fizzing away. You should get some bubbles on the top of the liquid too!
On Day 8 - you get to make the beer itself!
Mix 4 cups of sugar ( I used raw sugar) with 4 cups of water in a pot and heat until the water boils and the sugar dissolves. Take it off the heat and add 18 more cups of cold water. Use a big pot (at least 5 litres) so you have less cleaning up to do. Then add about 1/2 a cup of lemon juice.

You need to add the "juice" from the bug now. So get a bigger container, secure a piece of muslin or material that will act like a filter/sieve with a rubber band and spoon/tip the bug into it and leave it to drip for a while until the liquid is in the container and the sediment is trapped in the sieve material (or poke it and prod it like I did to hurry things along a bit!)

When you have got all the bug juice out and all the sediment is in the muslin/teatowel filter - somehow, manage to remove the tea towel (without spilling either the liquid or the sediment) and tip the bug juice into the sugar-water-lemon mix.

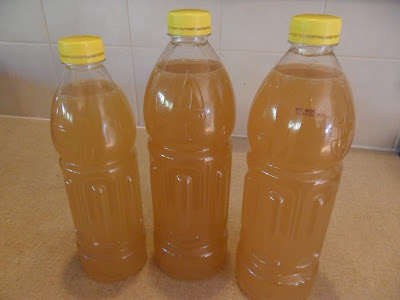
Give it a stir and then bottle the ginger beer into your plastic bottles. I highly recommend using recycled plastic1.25 litre soft drink bottles after cleaning up all that glass many years ago! Rinse out the bottles in as hot water as your hands can stand and fill up using a funnel and ladle with your about-to-be ginger beer.

I'd leave about a centimeter of head space (gap between the surface of the liquid and the lid) in the bottle as its probably going to expand. Leave your Ginger Beer in a cool place (NOT a warm place) to 'mature' for the next 3-5 days.
Your Ginger Beer is going to be ready when you can feel the pressure when you squeeze the bottle gently and possibly see a bit of fizz happening. Carefully and slowly open the lid and test/taste some after a few days and see what you think. When its the right fizz for you - pop it in the fridge to slow the yeast production and stop the bottles from expanding and possibly exploding on you! (if they are still expanding - just unscrew the lid a little, let the pressure out, tighten up the lid and keep in the fridge - or just drink it over ice and be done!)
Drink and enjoy!
To continue making Ginger Beer - Split the sediment into two jars. Add a cup of warm water, a teaspoon of sugar and a teaspoon of powdered ginger and simply start all over again. Each time you make a batch of ginger beer you will have to spit the bug. Set it up in a jar and give it to a neighbour, friend, your daycare, mothers group or relative with instructions on how to make their own Ginger Beer at home! Pass on the tradition!


Score card:
Green-ness: Home made soft drink from local product - muchly green!
Frugal-ness: Works out about $1 a litre (if you buy all the ingredients) less if you have your own lemons and find a packet of ginger powder in the pantry!
Time cost: 2 minutes to make the bug. A week to feed it and about 1/2 an hour to dissolve the sugar, squeeze the lemons, add the bug to the mixture and bottle. Another few days to wait for it to mature. 10 minutes to down the first litre with a couple of friends who pop in unexpectedly!
Skill level: If you can boil and egg you can do this too!
Fun -ness: Feels a bit like a mad scientist experiment!
Making ginger beer at home is not hard at all and a nice change from cordials (or soft drink if that's your thing!) and can be the basis for a few mock-tails and even a cocktail or two to boot!
Here's what I did...
Ginger beer has two steps to making it. The first is to make a "bug" that forms the basis of the drink and the second part involves straining the bug to use to make the actual drink.

To make the bug, I used Sally Wise's recipe in her book - A Year in a Bottle (lots of other goodies in there too) And you simply mix a teaspoon of powdered ginger, a teaspoon of sugar and 1/2 teaspoon of dried yeast to a cup of warm water in a jar. Give it a bit of a stir and then pop a piece of muslin or a hanky (I ended up using a tissue) over the top, secured with a rubber band. Leave it on the kitchen bench somewhere where you will see it everyday.

Then give it a feed every day - it will need a teaspoon of sugar and a teaspoon of powdered ginger and a quick stir for 7 days. You should see the yeast doing its thing and bubbling and fizzing away. You should get some bubbles on the top of the liquid too!
On Day 8 - you get to make the beer itself!
Mix 4 cups of sugar ( I used raw sugar) with 4 cups of water in a pot and heat until the water boils and the sugar dissolves. Take it off the heat and add 18 more cups of cold water. Use a big pot (at least 5 litres) so you have less cleaning up to do. Then add about 1/2 a cup of lemon juice.

You need to add the "juice" from the bug now. So get a bigger container, secure a piece of muslin or material that will act like a filter/sieve with a rubber band and spoon/tip the bug into it and leave it to drip for a while until the liquid is in the container and the sediment is trapped in the sieve material (or poke it and prod it like I did to hurry things along a bit!)

When you have got all the bug juice out and all the sediment is in the muslin/teatowel filter - somehow, manage to remove the tea towel (without spilling either the liquid or the sediment) and tip the bug juice into the sugar-water-lemon mix.

Give it a stir and then bottle the ginger beer into your plastic bottles. I highly recommend using recycled plastic1.25 litre soft drink bottles after cleaning up all that glass many years ago! Rinse out the bottles in as hot water as your hands can stand and fill up using a funnel and ladle with your about-to-be ginger beer.

I'd leave about a centimeter of head space (gap between the surface of the liquid and the lid) in the bottle as its probably going to expand. Leave your Ginger Beer in a cool place (NOT a warm place) to 'mature' for the next 3-5 days.

Your Ginger Beer is going to be ready when you can feel the pressure when you squeeze the bottle gently and possibly see a bit of fizz happening. Carefully and slowly open the lid and test/taste some after a few days and see what you think. When its the right fizz for you - pop it in the fridge to slow the yeast production and stop the bottles from expanding and possibly exploding on you! (if they are still expanding - just unscrew the lid a little, let the pressure out, tighten up the lid and keep in the fridge - or just drink it over ice and be done!)
Drink and enjoy!
To continue making Ginger Beer - Split the sediment into two jars. Add a cup of warm water, a teaspoon of sugar and a teaspoon of powdered ginger and simply start all over again. Each time you make a batch of ginger beer you will have to spit the bug. Set it up in a jar and give it to a neighbour, friend, your daycare, mothers group or relative with instructions on how to make their own Ginger Beer at home! Pass on the tradition!


Score card:
Green-ness: Home made soft drink from local product - muchly green!
Frugal-ness: Works out about $1 a litre (if you buy all the ingredients) less if you have your own lemons and find a packet of ginger powder in the pantry!
Time cost: 2 minutes to make the bug. A week to feed it and about 1/2 an hour to dissolve the sugar, squeeze the lemons, add the bug to the mixture and bottle. Another few days to wait for it to mature. 10 minutes to down the first litre with a couple of friends who pop in unexpectedly!
Skill level: If you can boil and egg you can do this too!
Fun -ness: Feels a bit like a mad scientist experiment!
Comments
That landlord of yours made me smile. I had a friend years ago that passed on a recipe for ginger beer that didn't use a plant..just brew it up in a big pot and then bottle it. It's been absolutely ages since I've made any..I'd like to try the plant method sometime! :)
I have an idea that the landlords stuff was ood really good and possibly alcoholic too!! If you make some a different way - let me know how! - Kara
carpet steam cleaning Manly
carpet steam cleaning Glebe