

I have a very good friends 40th birthday coming up and wanted to give her something special... Like most of us she either has all the things that she needs or she has the ability to just go and out and buy it as the need arises.
I could buy her some expensive alcohol, perfume or even a day spa (she was one of my bridesmaids, so price isn't an object here!) But I still wanted to give her something that was tangible - something she could hold, see and show to people.
I had been wrestling with this idea for a while and then one afternoon the crafty neighbour dropped in with this crafty magazine and there on the cover was a star card!

One look at that and I knew that's what I wanted to make for Narelle.
Here's what I did...
(Warning... this is a long and complicated post with lots of how to photos- if you are not crafty, this may not appeal...)


Frugal-ness: So far this has cost me about $12 in new papers so for a birthday present it is quite frugal.
Time cost: Up to this point, about 2 solid hours (there was a fair bit of unpicking at one point...)
Updated time cost - Probably somewhere in the vicinity of 10 hours all up. Its kinda fiddly, with a fair bit of cutting and pasting. I left it on the table for a week to get the bulk of it done and then managed to snatch a half hour here and there without having to get EVERYTHING back out again to finish it off.
Skill level: Advanced (or confident) Can be a bit tricky getting the book sewn together whether you sew it by hand or by machine.
I could buy her some expensive alcohol, perfume or even a day spa (she was one of my bridesmaids, so price isn't an object here!) But I still wanted to give her something that was tangible - something she could hold, see and show to people.
I had been wrestling with this idea for a while and then one afternoon the crafty neighbour dropped in with this crafty magazine and there on the cover was a star card!

One look at that and I knew that's what I wanted to make for Narelle.
Here's what I did...
(Warning... this is a long and complicated post with lots of how to photos- if you are not crafty, this may not appeal...)

First I selected some base card to use as the primary decoration - these are all 12x12 scrap booking card.

Then I selected the base colours for the actual card - you will need 7 sheets of each colour to make the base of the card.
I have cut these scrap booking 12x12's in half (just to make life easy) to get my 7 sheets. That means you only have to buy 4 of each colour.

Taking the dark base colour - I folded them in half.

Then I cut 6cm off the second colour to make them shorter so that when you fold them in half they don't nest inside each other along the spine when the edges touch, like so...

And then I cut 8cm off the end of the 3rd sheet so that it too, doesn't nest spine on spine, inside the other two but sits like the above.

With the bits I cut off the ends (Brown is 8cm and purple is 6cm) cut off, I folded them in half to use as a spacer. When the rest of the card is made this will make more sense.

Using these off cuts - I nested them along the crease of the base card (the darkest or longest card) and held them firm with a paperclip

In the book - the instructions were to hand sew each piece - I'm way to lazy for that and so I simply sewed them along the crease with a large straight stitch with my sewing machine. Leave lots of thread at each end.

So then you get 7 pieces like this.

When you stand them up - you can start to see the card taking shape. The idea now is to join the dark base card together. If you just glue the backs together, it wont be strong enough. The book says we should hand sew each portion to the next along the spine - in a book binding technique that was completely unfamiliar to me...

So what I did was to get two base cards and put them together the two bits that will eventually be glued together, together, folded back the rest and secured it with bulldog clips and then sewed them together along the inner edge. I was concentrating so hard that I totally forgot to take any photos. I did them in twos and then joined the two to another two and then three to a four to make a whole book. Its a bit rough on the sewing machine as it gets quite thick quite quickly. Sew slowly and think before you sew of you will have to unpick several times, like I did!

In the end you should have all the inners joined together along the spine.
Every second page should have the coloured spacers in it and every other page should have two dark base pages that we will glue together. (I have just noticed that this is a photo of one of the mistakes I made so don't look too closely at the card spacing - you are meant to be noting the left over cotton sticking out the top..Oops?!?)

Then tie all those threads together (top and bottom) in a big knot to secure the spine of the book.

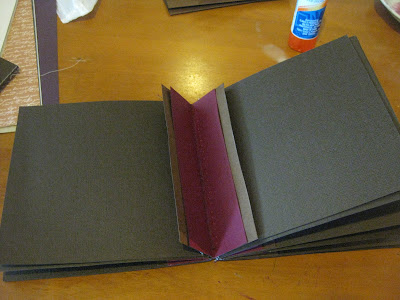
So if you have done it right you should have a book that has two black pages with no spacers in it like this... followed by,

A page with spacers.

Glue the black pages together. Now you should have a book with 2 covers (back and front - don't join it into a circle - leave two unjoined for the cover) and six pages. Keep reading below to get a better idea of whats happening.

Now we are starting to build the outer star bit. Glue along the edge of the a black page and glue in your middle colour. (see below)

As you can see in the photo, the black pages are glued together but the purple pages are only glued along the edge.

Hopefully this picture gives you a better idea.

This is the base book finished. Note the covers at the top - The whole book should now fold up to look like a book as well as sit opened up like a star.

Next fold the last colour for the outer in half - again so that it will not nest along the spine - and these will be the the part that we will now decorate BEFORE attaching them to the card. I was getting quite excited at this point and wanted to keep going - but if you decorate these parts before sticking them on I think it will save a lot of tears later!

So, folded in half - I have started sticking some base colours from the first photo, onto the cards. I have printed out some friendship sayings and photos to decorate it as well.
I have decided to upload this now as I have a few days of fairly intensive work happening now and am not sure when I will get a chance to do this - so if you are fairly crafty you can see where its going - If not stay tuned and I will update this post as I go along!
Update 27 July 2012 link - inserts almost finished
Update 4th August 2012 - finishing touches
Score card:
Green-ness: Making a present is not always greener but always appreciated!Frugal-ness: So far this has cost me about $12 in new papers so for a birthday present it is quite frugal.
Time cost: Up to this point, about 2 solid hours (there was a fair bit of unpicking at one point...)
Updated time cost - Probably somewhere in the vicinity of 10 hours all up. Its kinda fiddly, with a fair bit of cutting and pasting. I left it on the table for a week to get the bulk of it done and then managed to snatch a half hour here and there without having to get EVERYTHING back out again to finish it off.
Skill level: Advanced (or confident) Can be a bit tricky getting the book sewn together whether you sew it by hand or by machine.
Fun-ness: Awesomely fun when it starts coming together! I can't wait to see her face!
Comments
Have a look at this link - its to the last update with all sorts of pictures on it! Have fun - its lots of work but really worth it! - K xx
http://littlepracticalfrog.blogspot.com.au/2012/08/star-card-update-two-finishing-touches.html