

We live in the sub tropic and spend a lot of time outside in the evenings. We have been playing with cooking pizza's in our BBQ over the last few years and have got quite good at it. At the beginning of the year when I was sorting out menu planning I decided that we were good enough at it now to do it once a week. So Sunday evening has become our Pizza in the BBQ night. Its great fun and a wonderful way to wind down and catch up with everyone.
Here's how we do it...


Score card:
Green-ness: 5/5 if you are using home made/home gown ingredients. 5/5 for eating pizza and not supporting fast food corporations!
Frugal-ness: Depends on what you put on as toppings... Prawn and lobster is delicious but not very frugal! But overall, its got to be cheaper than buying commercial ones!
Time cost: An evening!
Skill level: If you can make pizza in your oven, you can make these! Just experimentation and a relaxed attitude to carbon in your pizza!
Fun-ness: Its one of the most anticipated meals of the week!
Here's how we do it...
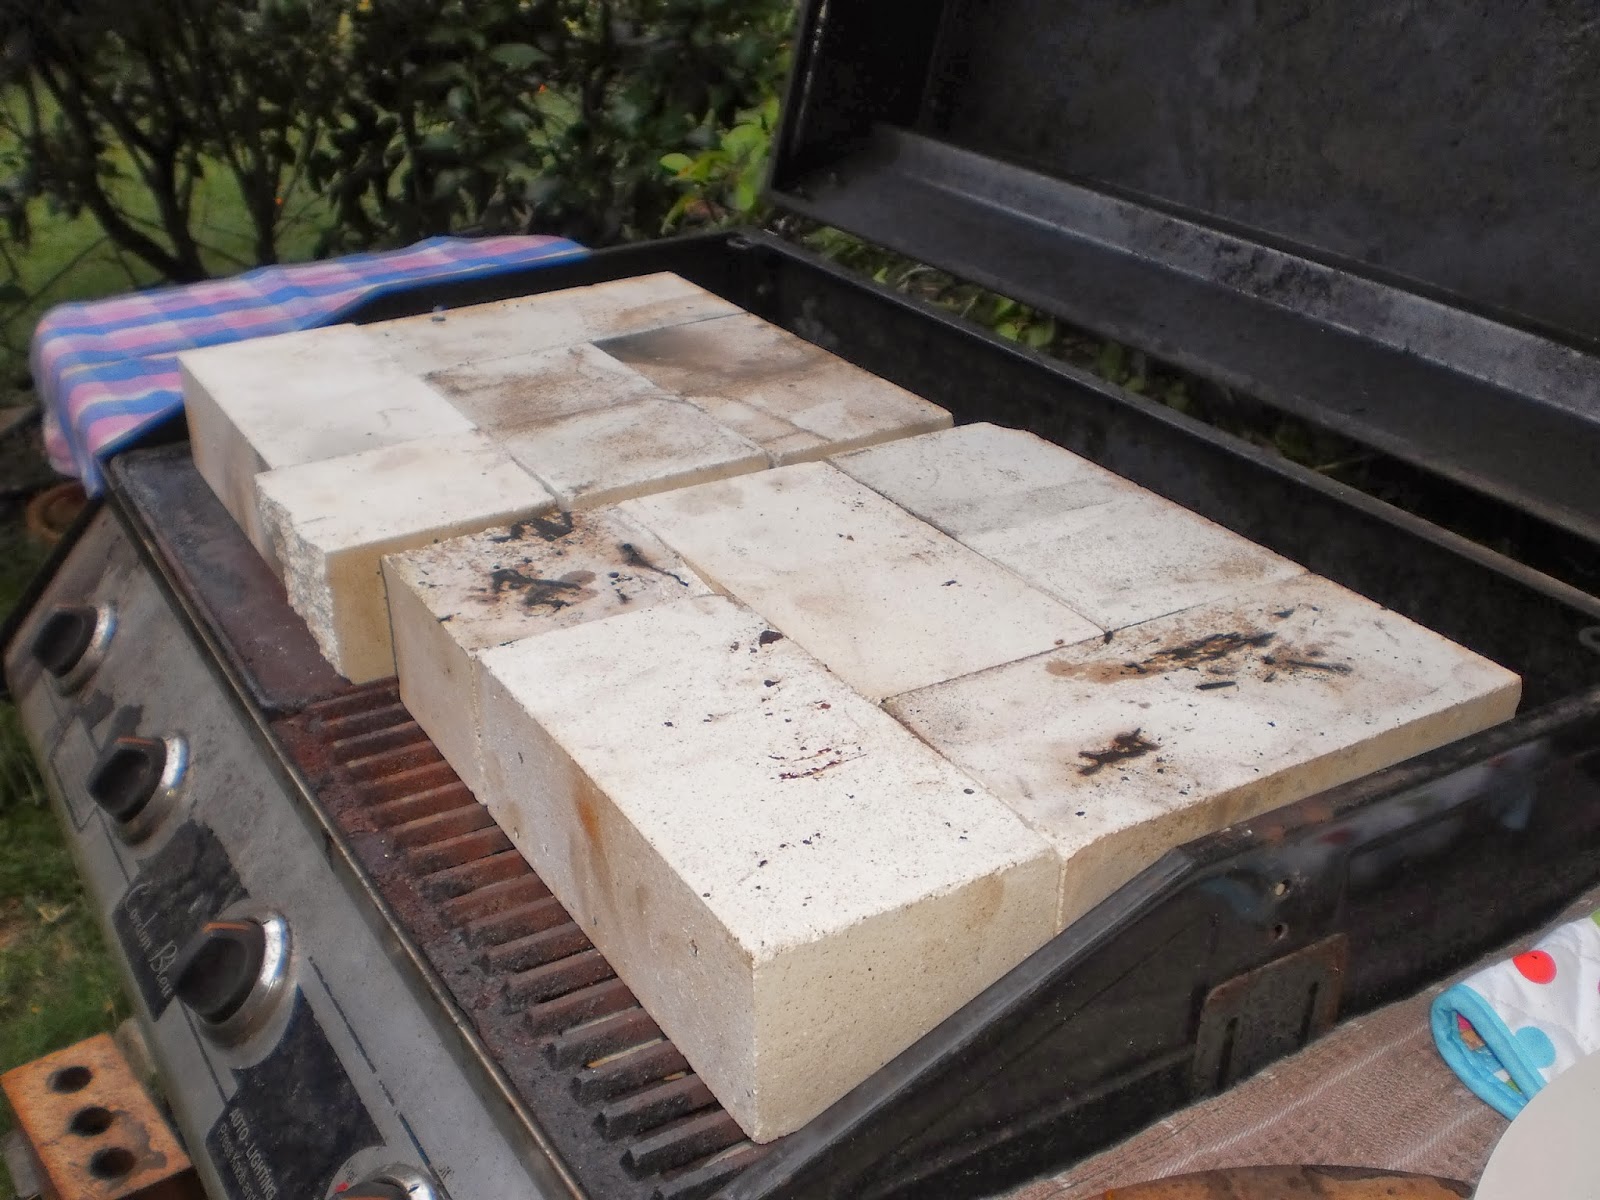
To cook Pizza on a BBQ you need one with a hood. You can see in the picture what ours is like. If you cook a pizza straight on the BBQ plate (even in a pizza tray) It simply burns the bottom of the pizza, so step one is to raise the pizza cooking area up. We are currently using a commercial pizza stone ($10 - $15) set up on bricks but four washed food cans works just as well. We use bricks (red ones are normal house bricks and the other purpose made fire bricks - but we haven't found any difference to making pizzas with either) as the cans sometimes fell over and when you have a 300 degree oven thing happening and need to stand up a can with a pizza in one hand and the BBQ cover in the other, things get quite heated!
As you can see, one of our stones is new. If you are going to cook two pizzas at a time (highly recommended) then on most BBQ's there is a grill and a hot plate. When you use the hot plate side, the heat from the gas burners is diffused by the steel plate and comes up relatively evenly. The grill side however, heats the stone unevenly, and as its expands, it cracks. Two bricks gives you a gap in the middle and very uneven temperatures. It took three broken stones for us to work this out.
We tried this arrangement as well, but found it took too long to heat up to cooking temperature. The bricks are pretty thick and it takes a lot of gas before they have absorbed enough heat to be able to cook the pizza well. Two bricks on the hot plate side has worked well for a long time and three on the Grill side seems to be enough to even out the temperature and cook the pizza well. If there is too much over hang, the stone will crack.
When we have our Pizza stones and bricks organised, we spinkle the stones liberally with flour to ensure our pizza's will slide on and off easily. Then we turn the gas on to high and light the BBQ. The lid goes down and we wait till it gets to 300-350 degrees Fahrenheit.
Homemade whole meal pizza dough busy rising on the bench out side.
While the BBQ is doing its thing we start making pizza's! Some times I make bread dough for large thick pizza's. Sometimes I make pizza dough for medium thick pizza's and sometimes I use burrito wraps for thin pizza's - depends on what mood you are in!
Beetroot, zucchini and squash, roasted and ready to go with chorizo and cheese!
Topping are as varied as you are in the mood for and as what is in season (or in the fridge). I have been preparing topping in bulk and making the same pizza for the whole night (with variations as we get to the end of the ingredients!) Toppings have been roast veges and chorizo, ham and pineapple, pumpkin and roast chicken, and mustard, beef and fetta.
Burrito base with beef, mustard, fetta and the few asparagus I got out of the garden
I start with a layer of tomato (paste, sauce or chutney) then a light layer of cheese (ordinary cheddar) then I put on the toppings, another light layer of cheese (mozzarella if we have it is tasty and fun!) and any herbs and seasonings. We are fairly light on the toppings compared to the monster versions that you get in a commercial pizza chain pizza. The thicker the base the more topping I put on though.
Roast vege with choizo and cheese on a bread dough base
Using a pizza paddle with a long handle and a tea towel on the hand (and on the arm sometimes- the handle gets very hot), we put the pizza into the BBQ and wait, maybe 10 minutes... Check it and if it looks ready, it probably is! Then we take it out with the paddle and place on the board for cutting and get the next one in asap!
We have found that after five or six pizza's its getting very hot in the BBQ and the pizza's sometimes burn on the bottom before the top is cooked. That's when we turn the gas down as there is plenty of heat in the stones to do the trick. If you "check" on the pizza too often you let all the heat out of the hood and the top can't cook as quickly as the bottom. The last pizza is often able to be cooked without the gas on at all.
We are making about ten small pizza's for the five of us over an hour or so. Its fun, relaxing and with the addition of a salad or two, a bottle of wine and even the neighbour, its a very, very pleasant way to spend an evening.
Score card:
Green-ness: 5/5 if you are using home made/home gown ingredients. 5/5 for eating pizza and not supporting fast food corporations!
Frugal-ness: Depends on what you put on as toppings... Prawn and lobster is delicious but not very frugal! But overall, its got to be cheaper than buying commercial ones!
Time cost: An evening!
Skill level: If you can make pizza in your oven, you can make these! Just experimentation and a relaxed attitude to carbon in your pizza!
Fun-ness: Its one of the most anticipated meals of the week!
Comments