

I love a cup of tea! I've never been a coffee drinker and as I've got older (and have a bit more pay in my pocket) I've moved on from the 500 teabags for $2 type cuppa to more sophisticated brews with added flavourings.
I prefer the Earl Grey over the English Breakfast and I'm very, very fond of the Lady Grey. For a while there was a Russian Earl Grey in the local Woolworths that we really loved and it disappeared from the shelves never to be seen again before we could stock up on it.
When we go into the city, we stop at the local T2 or Tea Centre and stock up on exotic smelling teas that are just divine (albeit not very frugal). I have bought flavoured teas online, from market stalls and from small shops that come and go around the area.
I've dabbled in making your own Chai tea from scratch which works well if you have the time and aren't expecting the type of chai tea you will get in a tea bag.
One day, when reading the ingredients list on the back of a tea box I realised that they were using flavourings. You would have thought that the label that said flavoured tea on the front may have given that away, wouldn't you, but I guess I had never made the connection between, lets say flavouring that you might use in an icing and flavouring that you might use in a tea. I had in my mind that teas were "natural" and therefore, so where the flavours - as in there were pieces of bergamot in my Earl Grey and pieces of lavender in my French Earl Grey. I hadn't made the connection that those pieces might be more "decoration" rather than what's actually flavouring the tea...
I rummaged through my baking shelf in the pantry and found a bottle of Almond essence and wondered - could I make a home made version of "Armaretto", one of my husband favourite teas...? Or even something more exotic?
Here's what I did...

First gather all your essences and flavourings and decide what flavours you like. You can mix and match or combine flavours to make teas like Butterscotch Rum or Chocolate Rose. I tend to stick to traditional flavour pairings as they have stood the test of time and will have a higher success rate than say Coconut Almond...

Then I put a loose leaf tea into a shallow container. I have done this in a deep container but it makes it harder to mix the flavourings in. This tea is Nerada. I've also used the Daintree loose leaf brand with great success. If you want to make a special blend with a high quality loose leaf tea, try your Orange Pekoe (This is a leaf quality level not a flavour) or mix a full leaf tea into your cut leaf blend. Ultimately it comes down to preference, price and availability when Im deciding which tea to use as the base.

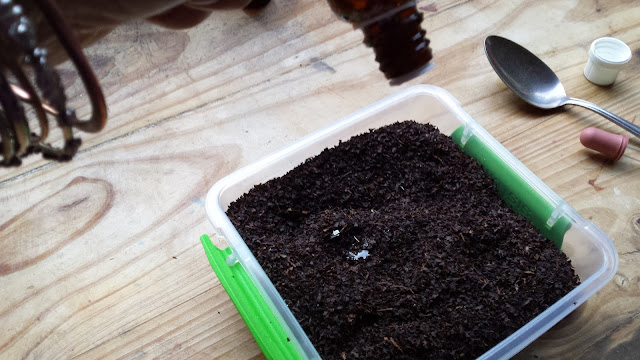
Add the flouring a drop at a time to the tea. I'm using about 15- 20 drops per 100gms. Add each drop in a different place to spread it through the tea.

If my essence doesn't have a dropper stopper on the top, I use an eye dropper otherwise I end up pouring waaaaayyy to much in. This needs a lighter touch than a heavier one. If you think you added too much, you can always "dilute" the flavour with more tea leaf.

You'll find that the tea will absorb the flavouring and "clump" a bit around the drops. It reminds me of when you add butter to flour to make scones. Using the same principle, use your fingers or a spoon to break up the clumps and distribute the flavour into the tea leaf.

I use the smell of the tea to determine if I have enough flavouring in there. A small amount will go a surprisingly long way. The tea leaf needs to be dryer rather than damp. Storing damp tea could lead to mould so if I think its too "wet" I add a bit more dry tea leaves to the mix. Its more of an art than a science. If you like cooking and baking then you'll be able to make some pretty accurate judgments just by looking and feeling the tea. I also like to leave the damp tea on the bench for a little while and turn it every time I walk past to mix it through and give it time to absorb through the leaf.

Once you are happy with the smell and texture, you can pretty it up by adding small bits of slivered almond to the almond flavoured one, bits of rose petal and/or chocolate drops to the chocolate rose, bits of butterscotch lolly chopped into tiny pieces into the butterscotch rum tea - you get the idea! :)
An advantage of adding "bits" to the tea is that you will be able to identify the tea by sight if not smell. Its more attractive, especially if you are giving it away in a jar or tin and looks more like we have come to expect from a flavoured loose leaf tea.
If you are going to make tea bags from the tea you just flavoured then I wouldn't worry about the "bits" unless your tea bag is see through. You can use the tag on the tea bag to identify the tea by writing on the tag or by using different coloured tags to represent each flavour.
I've been using repurposed olive jars to store my tea in. I covered them in pretty wrapping paper and put ribbons around them and make pretty labels (that soon gave way to handwritten, rubber banded versions as I got too lazy to make new label's each time! Maybe I should use blackboard paint and chalk to label the jars?) Tea should be stored away from heat and light. These jars are usually on a shelf in the kitchen and in reality, they get used up pretty quickly so I've never seen what happens to home flavoured tea that's stored for a long time!
I've also never tried using things like maple syrup or chai syrup to flavour leaf tea with. The sugar content will probably preserve the actual syrup but I don't know if it will attract ants, make the tea clump or... quite what...? If you've tried it - please let us know what happened in the comments section!
Flavouring combination ideas and their suggested "bits" to add
Have you tried this before? How did you go? What other hints and tips do you have for making your own home flavoured black teas? Let us know in the comments section below!
Score card:
Green-ness: ?/5 Is it green to drink flavoured tea? Greener to drink natural essence flavoured teas? I'm not sure on this one!
Frugal-ness: Much, much cheaper than buying flavoured tea from the big brands! You can choose the plain tea leaf quality you are prepared to pay for and a bottle of flavouring goes into more batches than you might think!
Time cost: About 10 minutes a batch - if that!
Skill level: Pretty basic - it would be hard to get this one wrong!
Fun-ness: Great fun to drink your own concoction of Coconut Rum tea and to surprise people with the fact you made it your self!
I prefer the Earl Grey over the English Breakfast and I'm very, very fond of the Lady Grey. For a while there was a Russian Earl Grey in the local Woolworths that we really loved and it disappeared from the shelves never to be seen again before we could stock up on it.
When we go into the city, we stop at the local T2 or Tea Centre and stock up on exotic smelling teas that are just divine (albeit not very frugal). I have bought flavoured teas online, from market stalls and from small shops that come and go around the area.
I've dabbled in making your own Chai tea from scratch which works well if you have the time and aren't expecting the type of chai tea you will get in a tea bag.
One day, when reading the ingredients list on the back of a tea box I realised that they were using flavourings. You would have thought that the label that said flavoured tea on the front may have given that away, wouldn't you, but I guess I had never made the connection between, lets say flavouring that you might use in an icing and flavouring that you might use in a tea. I had in my mind that teas were "natural" and therefore, so where the flavours - as in there were pieces of bergamot in my Earl Grey and pieces of lavender in my French Earl Grey. I hadn't made the connection that those pieces might be more "decoration" rather than what's actually flavouring the tea...
I rummaged through my baking shelf in the pantry and found a bottle of Almond essence and wondered - could I make a home made version of "Armaretto", one of my husband favourite teas...? Or even something more exotic?
Here's what I did...

First gather all your essences and flavourings and decide what flavours you like. You can mix and match or combine flavours to make teas like Butterscotch Rum or Chocolate Rose. I tend to stick to traditional flavour pairings as they have stood the test of time and will have a higher success rate than say Coconut Almond...

Then I put a loose leaf tea into a shallow container. I have done this in a deep container but it makes it harder to mix the flavourings in. This tea is Nerada. I've also used the Daintree loose leaf brand with great success. If you want to make a special blend with a high quality loose leaf tea, try your Orange Pekoe (This is a leaf quality level not a flavour) or mix a full leaf tea into your cut leaf blend. Ultimately it comes down to preference, price and availability when Im deciding which tea to use as the base.

Add the flouring a drop at a time to the tea. I'm using about 15- 20 drops per 100gms. Add each drop in a different place to spread it through the tea.

If my essence doesn't have a dropper stopper on the top, I use an eye dropper otherwise I end up pouring waaaaayyy to much in. This needs a lighter touch than a heavier one. If you think you added too much, you can always "dilute" the flavour with more tea leaf.


You'll find that the tea will absorb the flavouring and "clump" a bit around the drops. It reminds me of when you add butter to flour to make scones. Using the same principle, use your fingers or a spoon to break up the clumps and distribute the flavour into the tea leaf.

I use the smell of the tea to determine if I have enough flavouring in there. A small amount will go a surprisingly long way. The tea leaf needs to be dryer rather than damp. Storing damp tea could lead to mould so if I think its too "wet" I add a bit more dry tea leaves to the mix. Its more of an art than a science. If you like cooking and baking then you'll be able to make some pretty accurate judgments just by looking and feeling the tea. I also like to leave the damp tea on the bench for a little while and turn it every time I walk past to mix it through and give it time to absorb through the leaf.

Once you are happy with the smell and texture, you can pretty it up by adding small bits of slivered almond to the almond flavoured one, bits of rose petal and/or chocolate drops to the chocolate rose, bits of butterscotch lolly chopped into tiny pieces into the butterscotch rum tea - you get the idea! :)
An advantage of adding "bits" to the tea is that you will be able to identify the tea by sight if not smell. Its more attractive, especially if you are giving it away in a jar or tin and looks more like we have come to expect from a flavoured loose leaf tea.
If you are going to make tea bags from the tea you just flavoured then I wouldn't worry about the "bits" unless your tea bag is see through. You can use the tag on the tea bag to identify the tea by writing on the tag or by using different coloured tags to represent each flavour.
I've been using repurposed olive jars to store my tea in. I covered them in pretty wrapping paper and put ribbons around them and make pretty labels (that soon gave way to handwritten, rubber banded versions as I got too lazy to make new label's each time! Maybe I should use blackboard paint and chalk to label the jars?) Tea should be stored away from heat and light. These jars are usually on a shelf in the kitchen and in reality, they get used up pretty quickly so I've never seen what happens to home flavoured tea that's stored for a long time!
I've also never tried using things like maple syrup or chai syrup to flavour leaf tea with. The sugar content will probably preserve the actual syrup but I don't know if it will attract ants, make the tea clump or... quite what...? If you've tried it - please let us know what happened in the comments section!
Flavouring combination ideas and their suggested "bits" to add
- Chocolate Rose (Turkish Delight) - Rose petals
- Coconut Rum (Tropical Island) - Shredded Coconut
- Butterscotch Rum - Chopped up butterscotch lollies
- Cookies and Cream - Tiny chocolate buttons
- Rum and Raisin - dried currants (I thought raisins were too big)
- Chocolate Orange (Jaffa) - bits of dried orange peel
- Ginger and Vanilla - Chopped dried ginger
- Cherry Chocolate - tiny chocolate buttons and/or dried cherries bits
- Chocolate Coffee - coffee beans
- Chocolate Hazelnut (Nutella) - chopped hazelnuts
- Vanilla - chopped vanilla pod
- Caramel - Pieces of caramel lolly
- Coconut Lemon - shredded coconut
- Maple syrup - ??
- Chocolate coffee (Mocha) - tiny choc buttons and/or coffee beans
- Orange and cinnamon - Crushed cinnamon stick and/or dried orange pieces
Have you tried this before? How did you go? What other hints and tips do you have for making your own home flavoured black teas? Let us know in the comments section below!
Score card:
Green-ness: ?/5 Is it green to drink flavoured tea? Greener to drink natural essence flavoured teas? I'm not sure on this one!
Frugal-ness: Much, much cheaper than buying flavoured tea from the big brands! You can choose the plain tea leaf quality you are prepared to pay for and a bottle of flavouring goes into more batches than you might think!
Time cost: About 10 minutes a batch - if that!
Skill level: Pretty basic - it would be hard to get this one wrong!
Fun-ness: Great fun to drink your own concoction of Coconut Rum tea and to surprise people with the fact you made it your self!
Comments