

Under the funny shaped cabinet in the bathroom we have a wicker basket with a cloth lining to collect all the dirty clothes before they get washed. It took me a while to find one that was the right height and width to fit under there and so when it started falling apart, I didn't want to have to go through the performance of visiting every place in Queensland again, in order to get a new one. One morning while I was getting the washing out of the machine, I spotted a bunch of wire that the husband had bought home from some job and was sitting in the laundry (I don't know why he thought that was a good place for it to be...) and it triggered a though - what if I were to wire the basket back together? And thus the bionic basket was born!
Here's what I did...
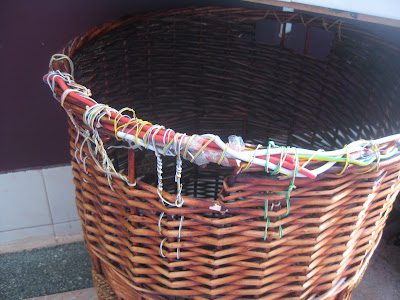
Basically, I used the thickest wires to rebuild the basket where the wicker was missing from the handles which is where most of the damage was from pulling out the heavy basket was. I then used the smaller ones to tie and strengthen it all together. Its not rocket science, (or even very pretty) I just needed the two items to be in my sight at the same to make the connection!


I have a couple of plastic washing baskets that I use to hang the washing out on the line that have handles broken or outright missing. I'm sure I can "fix" them the same way. I'm reluctant to throw them out as the rest of the basket is just fine. It annoys me when useful things break in one place that makes them hard to use, so I am happy to have stumbled on a way to save myself a few $ and not send something to landfill for a while longer.
Score card:
Green-ness: 5/5 Very green to fix an item rather than throw out and replace!
Frugal-ness: 5/5 to fix it with other materials that otherwise would have been thrown out!
Time cost: About 20 minutes.
Skill level: Therapy level basket weaving...
Fun-ness: Quite therapeutic one could say...
Here's what I did...
Basically, I used the thickest wires to rebuild the basket where the wicker was missing from the handles which is where most of the damage was from pulling out the heavy basket was. I then used the smaller ones to tie and strengthen it all together. Its not rocket science, (or even very pretty) I just needed the two items to be in my sight at the same to make the connection!

The thicker wires have been used to replace the wicker

The thinner wires have been used to tie it all together and to join it all back into the basket to keep the strength up by winding it through parts of the basket that were still whole and strong. I twisted the smaller wires to make them stronger and thicker as well.

Like I said - not pretty... But it seems to be working well.

Once it is covered with the liner, it looks ok.

I decided to add a bit of strengthening to the handle on the other side just to be on the safe side since it was starting to look a bit frayed and ragged - and I was still in the mood and had the time and the wire.
Score card:
Green-ness: 5/5 Very green to fix an item rather than throw out and replace!
Frugal-ness: 5/5 to fix it with other materials that otherwise would have been thrown out!
Time cost: About 20 minutes.
Skill level: Therapy level basket weaving...
Fun-ness: Quite therapeutic one could say...
Comments