Since I dyed my old-ish bath towels so successfully, I decided that I would have a go at the curtains that were sun bleached and very faded. They were 100% cotton (lots of man made fibres wont dye well if at all) and needed replacing/updating/refreshing. So I thought I would give it a go.
Here's what I did...
First weigh your item - you need to do this so that you use enough dye to get the colour you are aiming at. I rolled this curtain up and popped it on my kitchen scale. For the Tintex dyes that I used - you need 10gms of dye powder for every 500gms of material.
Thoroughly wet the fabric - this step tuned out to be more important than I originally thought. On my first dye attempt - I did bath towels. They soaked up the water so well that the issue that will become apparent further along didn't arise. At any rate, I think a lot of curtains and pillows will have been coated at some point in their manufacture with some sort of fabric protector and will be harder than you think to get wet evenly. (see photo below) A small squirt of detergent may help to get the water into the fabric.
Frugal-ness: 4/5 Extending the life of something with minimal cost - Very Frugal!
Time cost: About 45 minutes a curtain, but gave me an opportunity to clean out that corner while the curtains were down that I wouldn't have taken or cared about otherwise!
Skill level: For the more confident - not a good beginners project!
Fun-ness: Am happier now that they are back up and look OK - but the stress levels were quite high as I thought I had ruined the curtains for a while there!!!!
Here's what I did...
First weigh your item - you need to do this so that you use enough dye to get the colour you are aiming at. I rolled this curtain up and popped it on my kitchen scale. For the Tintex dyes that I used - you need 10gms of dye powder for every 500gms of material.
Thoroughly wet the fabric - this step tuned out to be more important than I originally thought. On my first dye attempt - I did bath towels. They soaked up the water so well that the issue that will become apparent further along didn't arise. At any rate, I think a lot of curtains and pillows will have been coated at some point in their manufacture with some sort of fabric protector and will be harder than you think to get wet evenly. (see photo below) A small squirt of detergent may help to get the water into the fabric.
I am using Tintex high temperature dyes for this project as they will be more colour fast and long wearing. There is a bit of a price difference between the cold water and the hot water dyes.
To weigh your dye, zero your scales with a Pyrex (hot water safe) glass (not plastic, unless you like it dyed too!) container that holds at least 250mls of boiling water.
Add the dye powder - I was aiming for slightly less than 20gms...
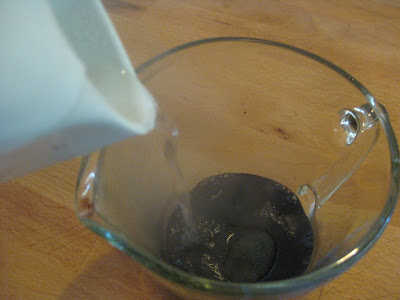
Add the boiling water - carefully. The splashes of dye wont come off lots of surfaces!
Then add the dye concentrate to your pot of boiling water. I used a 30 litre pot and it was probably a bit small for the amount of material that I wanted to dye.
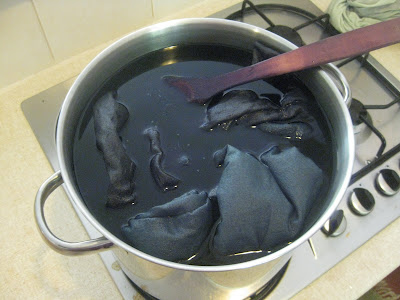
Slowly and carefully add the curtain to the dye bath ensuring that all the material gets submerged.
Bring the pot to the boil and keep an eye on it so that you don't boil the dye over and stain everything in sight!!! Also keep the curtain moving as much as you can in case there is a fold or twist and the dye cant get in to parts of the fabric.
After 30 minutes (40 minutes for darker colours, less for lighter) bring the pot to the sink. Be careful, that's a heck of a lot of boiling dye to spill on you and the floor!
Using a couple of pairs of kitchen tongs, lift the curtain out of the dye and drain as much of the dye out of it as you can. It takes a fair bit of strength to hold boiling curtains at eye level!!! Also, the stream is hot - be wary about where you grab the curtains. Don't be tempted to grab it with your hands, the staining to your hands will be minimal but the burns might not be!
Leave the curtain to sit in the sink for 5 minutes to let the dye set. In the meantime, prepare the dye bath for the next curtain.
Let cold water run over the curtain and start the rinsing process. Once the curtain is cool enough, squeeze as much water and dye out of it as possible.
Then hang on the line in the shade to dry.
This is when I discovered that I hadn't dyed these as well as I had hoped to...
The lighter colour is the original faded colour and the darker one the dye - This photo was taken on the line when I first noticed the unevenness. I didn't spot this until the curtain was unfolded.
After deliberating for a day or so - Note: The patchiness got worse when it was dry - I devised the following plan...
I spread all 4 curtains on the lawn and wet them with the hose.
Then I made up the dye as a CONCENTRATE - just the first part in the jug at the beginning of this post and put it in an old spray bottle. I'm tough in the photo but I got a tea towel pretty darn quickly as the dye concentrate is made from boiling water! Then I sprayed the lighter parts of the curtains with the concentrate. The water helped dissipate the dye and stop it from looking like I had simply sprayed it.
This is a wet but not re-dyed curtain...
You can see the difference in this image already.
I left them in the sun all day to dry, hoping that the heat of the sun would help set the dye as I had no other way of applying heat to this volume of material. I also only had 20gms of dye left to over dye all four curtains. After about 6 hours in the hot sun, I popped them through a rinse cycle in the washing machine and hung them out to dry again. I ran an iron over them and then re-hung them.
This is a before shot of the curtains...
This is an after shot!
The patchiness is not too obvious, either in the photos or in reality. It was quite stressful with such limited resources and I think the stress has coloured my perception of the success of the project. The real test will be to see who comments and how when they come to visit. The neighbours have been over to see "what I was up this time" so their comments wont count as they already know the trials and tribulations I went through!!! What do you think???
Score card:
Green-ness: 3/5 Lots and lots of water used and I'm not sure I like that I poured all that dye onto my back lawn either...Frugal-ness: 4/5 Extending the life of something with minimal cost - Very Frugal!
Time cost: About 45 minutes a curtain, but gave me an opportunity to clean out that corner while the curtains were down that I wouldn't have taken or cared about otherwise!
Skill level: For the more confident - not a good beginners project!
Fun-ness: Am happier now that they are back up and look OK - but the stress levels were quite high as I thought I had ruined the curtains for a while there!!!!


Comments
I'm debating whether to dye my sunbleached navy curtains, they are extremely thick and heavy 2kg each so wont fit comfortably into my washing machine. I've been researching, reading reviews and ideas like I should! Then I read yours from a few years ago, and like a previous comment I thought 'could I just spray bottle the worst areas?' if I wash them in the bath and spray whilst damp, concentrating on the bleached areas would that work? Then I thought I would ask you! its summer in England at the moment and we are having a few nice days so spraying outside won't be a problem, Thanks for your time.
So I say give it a go with the emphasis on making a textured or uneven pattern by spraying randomly or even try sponging as was suggested, as you wont be able to dye just one part and make it match, like you can if you are painting a wall, for example. I got another year or so out of the green curtains before they bleached again and I ended up with a cream set that I got from an op shop for a few dollars.
Let us know what happened! - Kara x
Curtain Singaporeyou may visit our website. You can also check our available services to offer.
Thank you and More power!!
You have been discovered it then you share it with your readers, I’m grateful because I’m one of your readers, I learn a lot from your posts, hope I will be able to read more. Do you have any idea aboutcurtain fabrication services singapore
? I'm really curious about it.
I really appreciate your professional approach. These are pieces of very useful information that will be of great use for me in future.
Discount PVC Curtains